Elevate the user experience and visual appeal of your comparison site with our expert UX/UI design services. We specialize in creating intuitive interfaces
Overview of Workflow
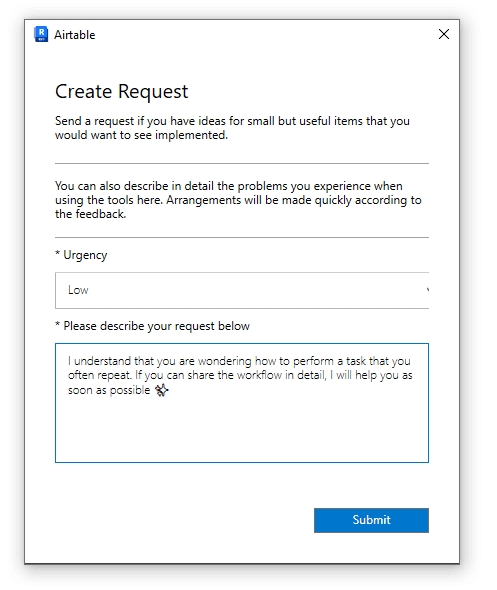
The task described in this workflow was to use Airtable to create a Revit plugin requirement database. Requests would have been submitted by users by inputting a Revit request record. The request will be collected in the Airtable system by providing the request's type and level of importance. It will be a good application to obtain comments as well.
This is not the only way that Airtable can be used with Revit. There are a ton of additional uses for Airtable, especially when you compare its flexibility to other database systems I've used. It can be applied to problems like data processing and standards.

Prerequisites
Before we dive into the code, make sure you have the following:
Python Environment: Ensure Python is installed on your machine.
Revit API Knowledge: Basic familiarity with the Revit API and how to use it in your projects.
Airtable Account: Sign up for an Airtable account and create a base with the necessary table and fields.
API Key: Generate an API key from your Airtable account.
pyRevit Installed: Make sure you have pyRevit installed as it simplifies the script development process for Revit.
Step 1: Setting Up the Python Environment
First, ensure that you have the necessary Python libraries installed. You will use the clr library to interact with .NET components and the json library for handling JSON data.
Step 2: Configuring the Airtable API
To interact with Airtable, you need your Airtable base ID, table name, and API key. Replace the placeholders in the code with your actual Airtable details.
Next, construct the URL for the Airtable API endpoint.
Step 3: Writing the Python Script
Here's the complete Python script that will send data to Airtable. This script defines a function make_request that accepts three parameters: name, request, and version. These parameters represent the data fields that you want to send to Airtable.
Step 4. Getting Revit Information
Step 5: Custom Window Class and Displaying Window
Conclusion
This script integrates Revit with a custom WPF window, allowing users to submit data through the window interface. The submitted data is then sent to Airtable via a web request, demonstrating how Revit data can be managed and extended using external services.
Feel free to customize the script and extend its functionality to meet your specific needs. If you have any questions or run into issues, don't hesitate to reach out for support.
Happy coding!
Additional Resources
Airtable API Documentation